【Goal】Let’s change the traffic settings of the map chip. In “Sample Map A,” we will make it possible to for a character to pass through or walk on a body of water (sea, lake, river, etc.).
[1] Click the “Tileset Settings” icon ![]()
[2] The window that appears is the “Tileset” window; this is where we will set the map chip.
- Select the tileset used in “Sample Map A.” Make sure that “0: City” is selected.
- Next, check whether the screen displays the “permission settings.” Make sure that the “Set Passable” button is pressed.
- The fifth tile in the “0: City” tileset is the water chip used in “Sample Map A.” There should currently be an [×] mark over it; please left-click the water chip until the symbol changes to [○]. (It switches in the order of ○→×→▲→★→□→○… If you right-click, it will switch in reverse order.)
- Click the “OK” button when done.
*There was a change in the “Set Passable” permission settings after Wolf RPG Editor was updated to version 2.00*
For all versions including 2.00 and beyond, the symbols that indicate a tile’s “passage” are divided into 3 separate buttons: [○・×][★・▲][↓・□]
Simply select one of the three options and the right-click or left-click the desired map chip.

[3] Since the settings are completed, we can click “Test Play” ![]() to check.
to check.
Can your character pass through the water now?
*Please Remember the Symbols Below*
[○] = you can pass
[×] = you can’t pass (solid)
[★] = always above character
[▲] = conceal character behind
[↓] = matches lower layer (○/×)
[□] = turns bottom half translucent
[Side Note 1] More information on the various symbols such as [★] and [▲] and [□].
[★]: A chip that is passable and is always displayed on top of the character.
[▲]: A chip that is passable and is always displayed in front of the character (covers the character when they walk behind it).
[□]: A chip that makes the character’s feet turn translucent at 16px. (It’s often used for producing things like “grass in the meadow” and “forest on the field map.”)
[Side Note 2] How to use [★] and [▲].
Both are suitable for when you want to display a tile chip above the character, but there is a difference between the conditions “when you go behind” or “always.”
It’s hard to explain in words, so take a look at the image below.
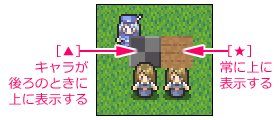
The left tile (stone) is set to [▲] while the right tile (wooden floor) is set to [★]. Both are drawn on layer 2.
Please pay attention to the two female characters in the front.
On the right [★], you can see that upper part of the character’s head is slightly hidden.
On the left [▲], the female character is full displayed in front of the stone tile whereas Wolfarl (blue lady) is hidden behind the stone tile.
This is the difference between [★] and [▲].
As for the criteria for different usage, it is probably fine to use:
[▲] for handrails, fences, and other items placed below
[★] for signboards, trees, and other high places
If you notice something strange during test play, you can change the details accordingly.
[Side Note 3] 1/4 Traffic Settings
To set traffic, left-click or right-click the desired map chip.
“Passage” can be set in units of 1/4 square.
Set whether or not each square can be passed by separating one square just like the character of a square.
- Hold down the [Ctrl] + [Shift] keys and [left-click] to set a 1/4 square with a [▲] traffic setting
- Hold down the [Ctrl] + [Shift] keys and [right-click] to set a 1/4 square with a [★] traffic setting
*Please note that there will be no effect unless the movement is set to 0.5 squares*
