*Auto tiles are tiles that connect automatically just by putting them next to each other. Usually, you would have to manually place the map chips for every corner, curve, and path, but that can be difficult if you don’t know how to connect them.*
【Goal】We will learn how to use auto tiles in order to draw a seamless map.
Note: The method is different for all Wolf RPG Editor versions up to version 1.31. If this is the case, scroll down to Side Note [2].
[1] Basic Setup
Open “Sample Map B” from the sample game.
Select [Layer 2] from the toolbar.
Using the river map chip, draw some parallel lines next to the goddess statue.
This setup will be used to demonstrate how auto tiles work.
[2] The Problem with Auto Tiles
If you close the gap between the parallel lines with river map chips, they will all be connected seamlessly.
Auto tiles will only connect if both chips are the same and are adjacent; for example, the river tile will only connect with a river tile and a snow tile will only connect with a snow tile.
The same feature applies for the edges of map chips.
[3] How to Disable the Auto Tile Function
In order to prevent map chips from connecting automatically, you need to hold down the [SHIFT] key while placing/pasting the map chips.
This will let you place the map chip exactly how it appears in the map chip index.
It would seem that this method is also used in another tool (in case you didn’t know).
[4] Let’s Practice
Place your cursor over a river and right-click to copy a piece of it.
Hold [SHIFT] and left-click a space adjacent to the existing river.
[5] Did it work?
If all goes well, the river tiles should not connect with each other automatically.
You can try this method as many times as you need to; it should work on all map chips (even trees!).
[6] How to Use Auto Tiles Again
If you’re fine with auto tiles, just copy and paste map chips like normal (right-click to copy; left-click to paste)
Don’t hold [SHIFT] unless you want to cancel auto tiles.
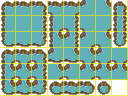
[Side Note 1] Number of Auto Tile Patterns
The auto tile function consists of 5 main parts: closed chip, vertical chip, horizontal chip, cross chip, and open chip.
You can arrange these 5 parts into various patterns, but how many patterns can be made?
The answer is… 47 patterns in total (If you include “no chip” then there is actually 48 patterns).
The following image displays the 5 main parts (left) and the 47 patterns (right).
![]()
[Side Note 2] What to do for Version 1.31 and Earlier
As mentioned before, this tutorial cannot be used with WRPGE versions prior to version 1.31, so we’ll be using a different method.
First, copy the auto tile shape with “[SHIFT] + right-click” and paste it with “left-click.” The new auto tiles will be placed in the same shape as when they were copied.
If you want to place the auto tiles like normal, then press “[SHIFT] + left-click” to return to the original mode.
Oh right, there’s a way to know which mode you are using; when you select an auto tile from the “map chip window” and place it down, two icons will appear:
- If you see
 , then the “auto tile function is on.”
 - If you see
 , then the “auto tile function is off.”
