【Introduction】I can’t give you a general answer since there are many ways to create a beautiful map, but here I will show you how to manipulate layers.
[Table of Contents]
- What is a layer?
- How to use layers pt. 1
- How to use layers pt. 2
- How layers are displayed in-game
- What if you don’t have enough layers?
- About the “Automatic Dungeon Map Generator”

What is a layer?
The “Layer” function allows you to organize map chips (tiles that make up a map) into different layers.
There are 4 layers in total: Layer 1, Layer 2, Layer 3, and the Event Layer.
Of these, layers 1 to 3 are mainly for placing map chips while the event layer is for placing events.
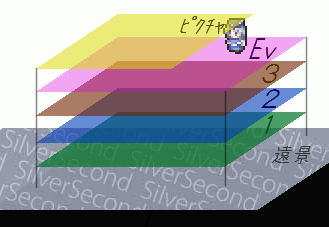
Usually, layers are essential for placing map chips that contain transparent colors.
The layers are arranged from small to big (Layer 1 at the bottom; Layer 3 at the top).
The Event Layer is above all three layers. *Map chips marked with a “▲” or “★” may be displayed above this layer*
There are two other special layers:
- Character Layer –> (highest layer) contains all of the characters
- Background Layer –> (lowest layer) displayed as a black screen by default
How to use layers pt. 1
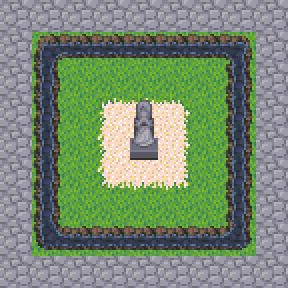
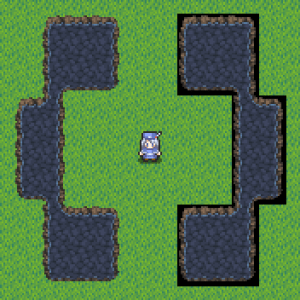
The map in the image on the right is displayed using layers.
Let’s take a look at this map layer by layer.
The following images are layers 1, 2, and 3 from left to right.
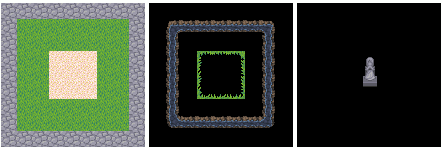
Layer 1 has cobblestones, grasslands, and sands.
Layer 2 has water and edges (grasslands).
Layer 3 has a statue of a Goddess.
On the actual game screen, these separate layers are displayed as a single picture as shown previously.
I want you to notice that the map chips with transparent parts are placed on layers 2 and above; conversely, map chips without transparent parts should be placed on layer 1.
How to use layers pt. 2
The purpose of layering is to stack transparent map chips on top of other map chips. A transparent color means that you can literally see through to the bottom/background.
As such, if a map chip is below a transparent map chip, it will be displayed, otherwise, the background will be shown.
If the background is not altered, it will remain black by default.
Transparent areas were created in layer 1 as shown in these two images.
The image on the left has a set background whereas the image on the right has no background (default).
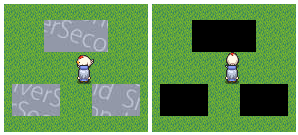
For example, to make a pond on a grassland, you will need to use both “Basechip.png” and “Waterchip.png”.
The water chip has a transparent edge, so the bottom layer will be partly visible. Let’s make the grassland visible through the transparent edge.
Place a field of grass chips on layer 1 and then some water water chips on layer 2. (left side of image)
If you try to do this with only one layer, the black area (transparent edge) will be visible and the map will look weird. (right side of image)
The chips included in the sample are all placed on layer 2 or 3 except for the “waterfall” in “Auto Tiles.”
Even if they are not auto tiles, vegetation, fences, furniture, roofs, etc. contain transparent parts. Place these map chips on layer 2 or 3 as well.
In addition, chips such as “grassland” and “sand” that don’t contain transparent parts should be placed on layer 1.
How layers are displayed in-game
Each layer only shows the map chips placed on that layer and the map chips on other layers are quite thin, so it may be difficult to tell how they will appear on the actual game screen.
In such a case, click the “Event Layer” icon ![]() to switch to the Event Layer (clicking the test-play button
to switch to the Event Layer (clicking the test-play button ![]() is also fine).
is also fine).
In this layer, you can arrange events and see the map from the viewpoint of the actual game screen.
Since making a map is a task that requires frequent checking, it is very convenient to check it in the event layer.
What if you don’t have enough layers?
As of now, Wolf RPG Editor (version 2.10D) has a maximum of 3 layers available. However, it is possible to use the event layer to make it look like there are 4 layers.
For example, if you wanted to place a floor, table, dish, and cake all on the same tile, then you could simply do: floor (layer 1) –> table (layer 2) –> dish (layer 3) –> cake (event layer).
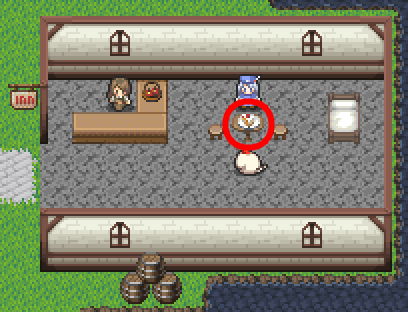
In the image on the right, the cake is an event placed on top of the other three layers.
When you use this method, what you place as an event may appear behind another chip in the actual game.
If that happens, check the map chip’s traffic settings. Chips marked with [▲] or [★] will be displayed above the event.
Read below for how to deal with either situations:
1. Chips marked with [▲]
Check the box labeled “Above Hero” in the desired event’s settings. This way, the event chip will be shown at the front.
2. Chips marked with [★]
Currently, there is no way to display an event above a [★] chip. However, you can try to work around the problem by changing the traffic setting of the chip in question to [▲].
For more information on [▲] and [★] traffic settings, refer to the tutorial: Changing the traffic settings of map chips.
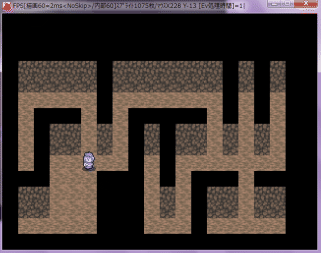
About the “Automatic Dungeon Map Generator”
Wolf RPG Editor has an automatic map generation system (provided by Het). It’s a very useful tool for making dungeons as it specializes in creating intricate maps.
The map in the image on the right was generated using this system.
Now let’s learn about how to use this auto-map generator.
[1] First, create a new map.
Please click on the “Auto-Create Map” icon. ![]()
[2] The “Auto Generate Map” window should appear.
Auto-map generation consists of four chips: “ceiling,” “top wall,” “bottom wall,” and “floor.”
All generated walls are two spaces tall and consist of the “top wall” and “bottom wall.”
The space above the wall is the “ceiling” whereas the space below it is the “floor.”
All areas other than the walls and floors are filled with the same material used for the “ceiling.”
[3] Register a chip to use it.
Try registering the same chip for the “upper wall” and “lower wall.”
The “floor” chip will need to be slightly different; try using chips such as “grassland,” “sand,” or “snow.”
Don’t register anything for the “ceiling.” If you happen to do so, just check the box labeled “No Draw” and it will disappear.
[4] After the settings are complete, generate the map.
Click the “Generate Map” button.
You will see a preview of the generated map on the left of the window.
[5] Each time you press the “Generate Map” button, another diagram will will be generated, so you can do this several times.
Once you are satisfied with a design, click the “Fill With This” button to display the complete dungeon.
[Side Note]
Let’s talk briefly about other settings such as “Target Layer,” “Wall Height,” “Complexity,” and “Make Smooth Shape.”
“Target Layer” refers to the layer you want to generate the map/dungeon on. It is recommended to use layer 1, but if you want to create a map/dungeon using chips with transparent parts, then use layer 2 or 3.
“Wall Height” is a bit confusing as it refers to a literal “wall” or “barrier.” It would be better to think of it as the “number of ceiling tiles.” A small number will have less “ceiling” tiles; a big number will have more “ceiling” tiles. (If you try 10% and then 90% on a large map, you’ll see the difference.)
“Complexity” refers to how narrow or spacious a map/dungeon can be. Setting the “complexity” to “simplest” or “simple” will reduce the amount of walls between floors. The “Most Complex” setting will generate a rather intricate maze. However, “Complexity” is affected by “Wall Height,” so if the map/dungeon is not as complicated as you’d like, try decreasing the value of “Wall Height.”
“Make Smooth Shape” will generate a map/dungeon with diagonal pathways. If the box if left unchecked, then the generated map will only consist of vertical and horizontal pathways. (This setting is good for making natural dungeons like caves.)
